


REQUEST A CALL BACK
ENGINE OIL LEVEL
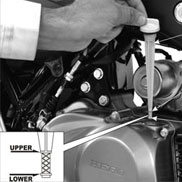
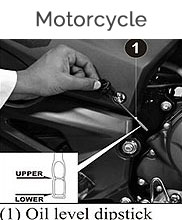
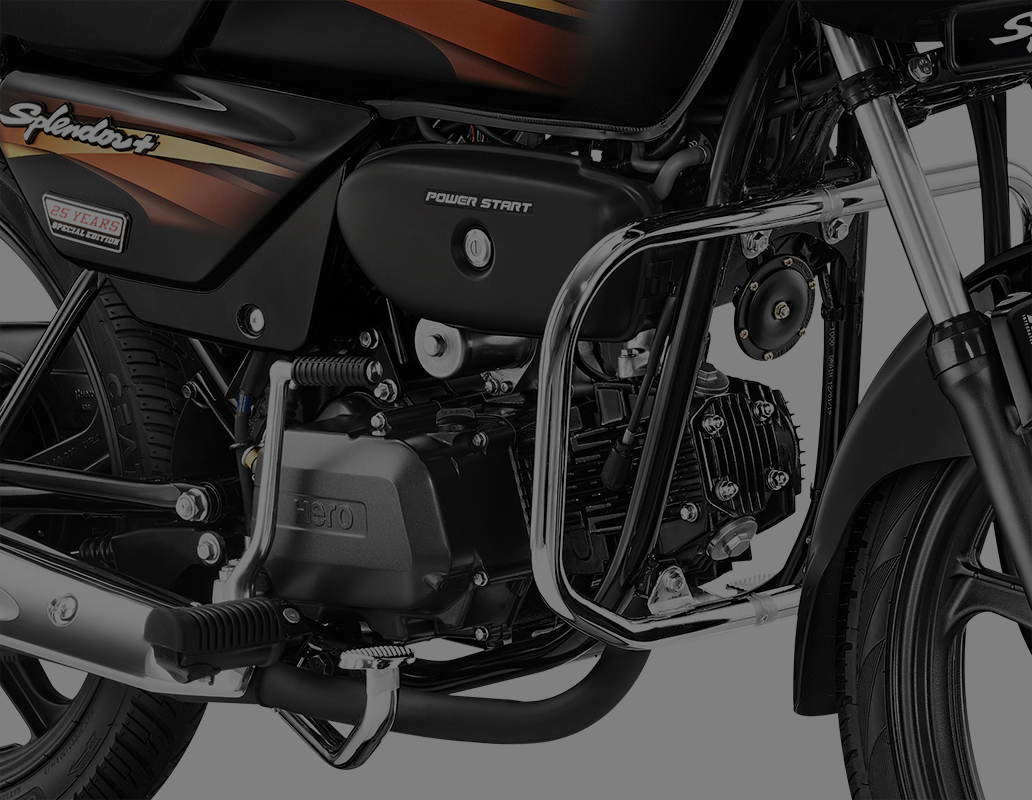
Engines With Oil Level Dipstick
Engine Oil Level Check
- Check engine oil level each day before operating the motorcycle.
- The oil level dipstick is on the right crankcase cover for measuring oil level.
- Oil level must be maintained between the upper and lower level marks on the oil level dipstick.
- Do top up if oil level reaches towards the lower level mark or every 3000 kms, whichever is earlier.
Engine oil Top up Process
- Check engine oil level in the oil level window each day before operating the motorcycle.
- Oil level should be between upper and lower level marks.
- Do top up if oil level reaches towards the lower level mark or every 3000 kms, whichever is earlier.
- Start the engine & let it idle for 3-5 minutes.
- Stop the engine & park the motorcycle on its main stand on level ground.
- Remove the oil level dipstick and wipe it clean.
- Reinsert the oil level dipstick without screwing it in and check the oil level.
- If required, add the specified oil up to the upper level mark. Do not overfill.
- Reinstall the oil level dipstick and check for oil leaks.
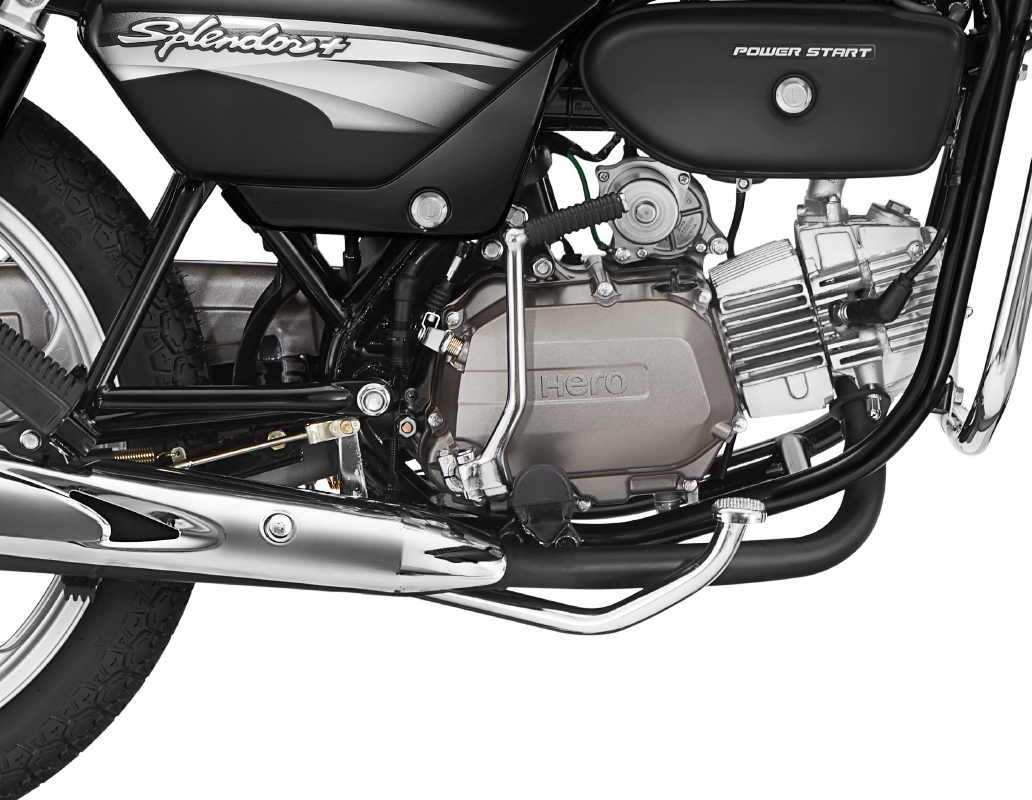
Engines With Oil Level Window
Engine Oil Level Check
- Check engine oil level in the oil level window each day before operating the motorcycle.
- Oil level should be between upper and lower level marks.
- Do top up if oil level reaches towards the lower level mark or every 3000 kms, whichever is earlier.
Engine oil Top up Process
- Start the engine & let it idle for 3-5 minutes.
- Stop the engine & park the motorcycle on its main stand on level ground.
- After 2-3 minutes, check the oil level in the oil level window. It must be between upper and lower level marks.
- Add the specified oil by removing the oil filler cap and filling till the upper level mark. Do not overfill.
- Reinstall oil filler cap & check for oil leaks.
Drive Chain
Non Sealed Type
The service life of the drive chain is dependent upon proper lubrication and adjustment. Poor maintenance can cause premature wear or damage to the drive chain and sprockets. The drive chain should be checked and lubricated as part of the Pre-ride Inspection. Under severe usage, or when the motorcycle is ridden in unusually dusty areas, more frequent maintenance will be necessary.
Inspection
- Turn the engine "OFF", park the motorcycle on its main stand and shift the transmission to neutral. Remove hole cap.
- Drive chain slack should be adjusted to allow approximately 25 mm vertical movement by hand.
- Rotate the wheel and check drive chain slack as the wheel rotates. Drive chain slack should remain constant as the wheel rotates. If the chain is slack in one section and tight in another, some links are kinked and binding. Binding can be eliminated by frequent lubrication.
- Turn the chain to view chain lock plate inside the hole. Ensure that the chain lock plate open end is installed in the opposite direction of the chain rotation.
Inspect the sprocket teeth for wear or damage.
If the drive chain or sprockets are excessively worn or damaged, they should be replaced. Never use a new chain with worn out sprockets since this will result in rapid chain wear.
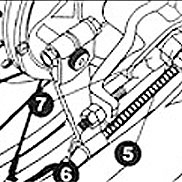
Adjustment
- Park the motorcycle on its main stand with the transmission in neutral and the ignition switch in "OFF" position.
- Loosen the rear axle nut and sleeve nut.
- Loosen the drive chain lock nut.
- Turn both the adjusting nuts in an equal number of turns until the correct drive chain slack is obtained. Turn the adjusting nut clockwise to decrease the slack or anticlockwise to increase the slack of the chain.
- Align the chain adjuster index mark with the corresponding scale graduations on both the sides of the swing arm equally.
- If the drive chain slack is excessive when the rear axle is moved to the farthest limit of adjustment, the drive chain is worn and must be replaced.
- Tighten the rear axle nut and sleeve nut.
- - Rear axle nut torque: 5.4 kgf-m.
- - Sleeve nut torque: 4.4 kgf-m.
- Check the drive chain slack again.
- Rear brake pedal free play and stop lamp switch free play are affected when repositioning the rear wheel to adjust drive chain slack. Check rear brake pedal free play and adjust as necessary.
Lubrication
- Turn the engine "OFF", park the motorcycle on its main stand and shift the transmission into neutral.
- Lubricate the drive chain by applying liberal amount of SAE 90 oil.
Caution
Regular adjustment and lubrication as per the maintenance schedule would ensure high performance and longer life.
Note
Visit authorised Hero MotoCorp workshop for inspection, cleaning, lubrication and adjustment of drive chain at every 2000 kms.
Sealed Type
The service life of the drive chain is dependent upon proper lubrication and adjustment. Poor maintenance can cause premature wear or damage to the drive chain and sprockets. The drive chain should be checked and lubricated as part of the Pre-ride Inspection. Under severe usage, or when the motorcycle is ridden in unusually dusty areas, more frequent maintenance will be necessary.
Inspection
- Turn the engine off, raise the rear wheel “OFF” the ground by placing a support block under the engine and shift the transmission into neutral.
- Check the drive chain slack in the lower drive chain run midway between the sprockets. Drive chain slack should be adjusted to allow the follow vertical movement by hand.
Drive chain slack : 25 mm
Rotate the rear wheel. Stop. Check the drive chain slack. Repeat this procedure several times. Drive chain slack should remain constant. If the chain is slack only in certain sections, some links are kinked or binding. Binding and kinking can be eliminated by frequent lubrication.
Note
- Excessive drive chain slack may damage the bottom of the frame or the chain could come off the sprockets.
- Rotate the rear wheel slowly and inspect the drive chain and sprockets for any of the following conditions.
Drive Chain
- Damaged rollers
- Loose pins
- Dry or rusted links
- Kinked or binding links
- Excessive wear
- Improper adjustment
- Damaged or missing O-rings
Sprockets
- Excessively worn teeth
- Broken or damaged teeth
If the drive chain has damaged rollers, loose links or missing o-rings, replace it. If the chain is dry or rusted, it should be lubricated. Lubricate the chain if the links are kinked or binding. If the problem is not solved after lubrication, replace the chain.
If the drive chain or sprockets are excessively worn or damaged, they should be replaced.
Caution
Always replace the drive chain and sprockets as a set. Otherwise the new part will wear prematurely.
Note
Drive chain slack should be checked and adjusted, if necessary, every 1000 km.
Lubricate every 1000 km or sooner if the chain appears dry.
Drive Chain Wear Indicator
If after adjustment of drive chain slack the double headed arrow reaches the red line on the wear indicator label, the drive chain kit has to be replaced.
Note
When a new drive chain kit is installed adjust the drive chain slack and then attach a new wear indicator label while aligning the double headed arrow with the black line on the label.
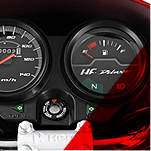
Fuel Level/ Fuel Valve
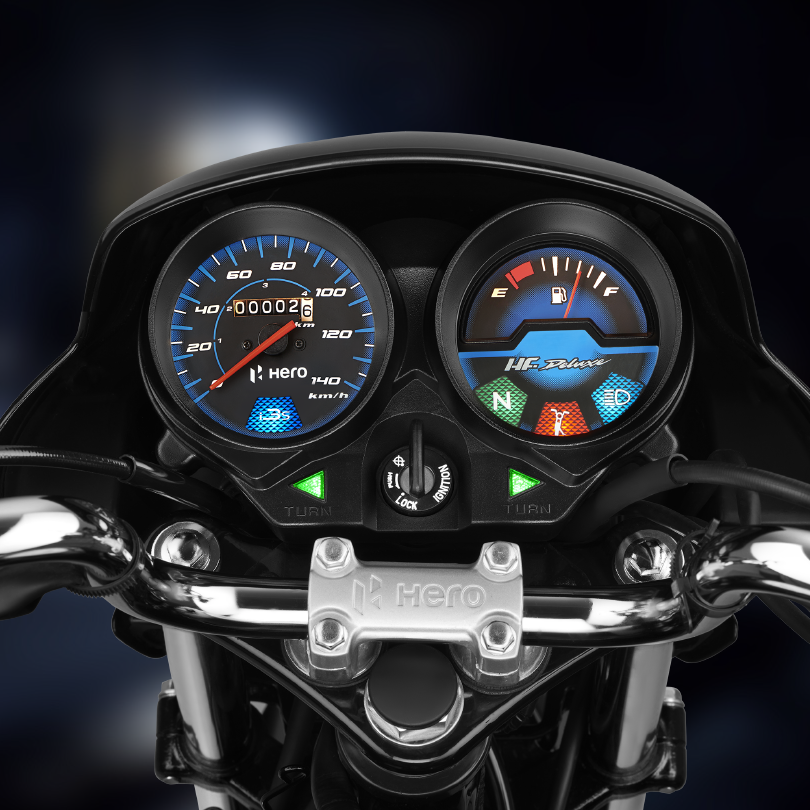
- Ensure sufficient fuel is available in your fuel tank for your journey. Check for leaks.
- The approximate amount of fuel quantity available in the fuel tank is indicated by the number of segments in the display/Fuel gauge meter in the console.
- If only one segment is displayed above the red mark/If the needle reaches the red mark in the fuel gauge meter, this indicates that the fuel quantity is low and the fuel tank should be refilled as soon as possible.
The Hero MotoCorp Vehicles are categorized in to three based on the function of Fuel Valve,
- Carburetor motorcycles (Fuel Valve)
- Programmed FI motorcycles ( Fuel Injection )
- Scooters ( Auto Fuel Valve)
The three-way fuel valve is on the left side of the carburetor.
OFF - At "OFF" position fuel cannot flow from the tank to the carburetor. Turn the valve "OFF" whenever the two-wheeler is not in use.
ON - At "ON" position fuel will flow from fuel tank to the carburetor.
RES - At "RES" position fuel will flow from the reserve fuel supply to the carburetor. Use the reserve fuel only when the main supply is exhausted. Refill the tank as soon as possible after switching to "RES" position. The reserve fuel supply is specified as per our model.
Note
- Do not operate the two-wheeler with the fuel valve in the "RES" position after refilling, you may run out of fuel, with no reserve.
- Do not keep the fuel valve between "ON" and "OFF" position while riding, since this may drain reserve fuel from the tank.
Caution
- Do not park the motorcycle under direct sunlight as it causes evaporation of petrol due to heat and deterioration of paint gloss due to ultra violet rays.
Warning
- Petrol is extremely flammable and is explosive under certain conditions.
- Refill in a well ventilated area with the engine stopped.
- Do not smoke or allow flames or sparks in the where the petrol is refilled or where the petrol is stored.
Brakes
Front/ Rear Brake (Disc Type)
Check operation and adjust free play if necessary
- The master cylinder/ reservoir is located in the right handlebar
- The master cylinder/ reservoir is located behind right side cover next to the battery.
- Check for the correct brake fluid in the master cylinder.
Recommended Brake Fluid: DOT 3 or DOT 4
- Ensure that the brake fluid level does not fall below "MIN" mark on front brake master cylinder parallel to the ground.
- The level decreases gradually due to piston movement to compensate pad wear.
- If the level decreases abruptly, check for the leakages in the brake system and consult your Authorised Hero MotoCorp workshop.
Note
- Clean the dirt and mud accumulation between the brake pads caliper and the disc by using a water jet.
- Always contact your Authorised Hero MotoCorp workshop for refilling of master cylinder when necessary.
Caution
Do not mix DOT 3 and DOT 4 brake fluid.
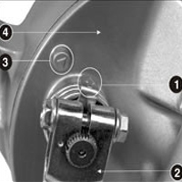
Front Brake (Drum Type)
- Park the motorcycle on its main stand.
- Measure the distance, the front brake lever moves before the brake starts to take hold.
- Free play should be 10-20 mm at the tip of the brake lever.
- If adjustment is necessary, turn the adjusting nut.
- Make sure that cut-out on the adjusting nut is seated on the brake joint pin after making final free play adjustment.
- Apply the brake several times and check for free wheel rotation when released.
Note
If proper adjustment can not be obtained by this method, visit your Authorized Hero MotoCorp workshop.
Tyres

Tyres With Tube
The tyres that are fitted on your motorcycle are designed to match the performance capabilities of your motorcycle and provide the best combination of handling, braking, durability and comfort. To safely operate your motorcycle, the tyres must be of recommended type and size, in good conditon with adequate tread, and correctly inflated.
Air Pressure
Properly inflated tyres provide the best combination of handling, tread life and riding comfort. Generally, under inflated tyres wear unevenly, adversely affect handling, and are more likely to fail from being overheated.Under inflated tyres can also cause wheel damage in rocky terrain.
Over inflated tyres make your motorcycle ride more harshly, are more prone to damage from surface hazards, and wear unevenly.Make sure the valve stem caps are secure. If necessary, install a new cap.
Caution
Over inflation / under inflation will affect the performance.
Inspection
Whenever you check the tyre pressure, you should also examine tyre treads & side walls for wear, damage 7 foreign objects.
Look for:
- Bumps or bulges in the side of the tyre or the tread. Replece the tyre if you find any bumps or bulges.
- Cuts, splits or cracks in the tyre.
- Excessive tread wear.
Note
If you hit a pothole or hard object, pull to the side of the road as soon as you safely can and carefully inspect the tyres for damage.
Tread Wear
Replace tyres immediately when the wear indicator appears on the tyre. Check the tread wear indicator for tyre wear.
Unidirectional Tyres
Ensure the arrow mark on the tyre is in the same direction as that of forward rotation of the wheel, whenever the tyre is removed and put back in case of puncture.
Warning
- By Using tyres that are excessively worn or improperly inflated can cause a crash in which you can be seriously hurt or killed.
- Operation with excessively worn tyres is hazardous and will adversely affect traction and handling.
- Follow all instructions in this owner’s manual regarding tyre inflation and maintenance.
- Under-inflation may result in the tyre slipping on or tyre coming off the rim.
Tubeless Tyres
The tyres fitted on your motorcycles are of TUBELESS type.
To safely operate your motorcycle, your tyres must be of the proper type and size, in good condition with adequate tread, and correctly inflated for the load you are carrying. The following pages give more detailed information on how and when to check the air pressure, how to inspect your tyres for damage and what to do when your tyres need to be repaired or replaced.
Warning
Using tyres that are excessively worn or improperly inflated can cause a crash in which you can be seriously hurt or killed.Follow all instructions in this owner's manual regarding tyres inflation and maintenance.
Air Pressure
Keeping your tyres properly inflated provides the best combination of handling, tread life and riding comfort. Generally, under-inflated tyres wear unevenly, adversely affect handling and are more likely to fail from being overheated.
Over-inflated tyres make your motorcycle ride harshly, are more prone to damage from road hazards, and wear unevenly.
We recommend that you visually check your tyres before every ride and use a gauge to measure air pressure at least once a month or any time you think the tyres pressure might be low.
Tubeless tyres have some self-sealing ability if they are punctured. However, because leakage is often very slow, you should look closely for punctures whenever a tyre is not fully inflated.
Always check air pressure when your tyres are "cold" - when the motorcycle has been parked for at least three hours. If you check air pressure when your tyres are "warm" - when the motorcycle has been ridden for even a few kms - the readings will be higher than if the tyres were "cold". This is normal, so do not let air out of the tyres to match the recommended cold air pressures given below. If you do, the tyres will be under-inflated.
Caution
Over inflation / under inflation will affect the performance.
Inspection
Whenever you check the tyre pressure, you should also examine tyre treads & side walls for wear, damage 7 foreign objects.
Look for:
- Bumps or bulges in the side of the tyre or the tread. Replece the tyre if you find any bumps or bulges.
- Cuts, splits or cracks in the tyre.
- Excessive tread wear.
Note
If you hit a pothole or hard object, pull to the side of the road as soon as you safely can and carefully inspect the tyres for damage.
Tread Wear
Replace tyres immediately when the wear indicator appears on the tyre. Check the tread wear indicator for tyre wear.
Unidirectional Tyres
Ensure the arrow mark on the tyre is in the same direction as that of forward rotation of the wheel, whenever the tyre is removed and put back in case of puncture.
Warning
- Using tyres that are excessively worn or improperly inflated can cause a crash in which you can be seriously hurt or killed.
- Operation with excessively worn tyres is hazardous and will adversely affect traction and handling.
- Follow all instructions in this owner’s manual regarding tyre inflation and maintenance.
- Under-inflation may result in the tyre slipping on or tyre coming off the rim.
Note
For repair and replacement of tyre it is advised to visit your Authorised Hero MotoCorp workshop.
Important Safety Reminders
- Do not install a tube inside a tubeless tyre on this motorcycle. Excessive heat buildup can cause the tube to burst.
- Use only tubeless tyres on this motorcycle. The rims are designed for tubeless tyres, and during hard acceleration or braking, a tube-type tyre could slip on the rim and cause the tyre to rapidly deflate.
Tube With Puncture Endurance
Tube with Puncture Endurance is a genuine part specially designed for the tyre of your scooter.
Features
See the following drawings for the "Tube with Puncture Endurance" structure. It has a "fluid chamber" filled with a special fluid at the ground side of the tube as shown. When a sharp object such as a nail etc. pierces into the tyre, fluid is pushed out by the air pressure plugging up the hole with the fiber in the fluid. Thus, the “Tube with Puncture Endurance” is designed to minimize air leakage.
Note
Tube with Puncture Endurance is not designed to prevent every puncture damage of the tube Use the Tube with Puncture Endurance on the scooter equipped with the genuine tyres. Note that the Tube with Puncture Endurance are available in every size, which are designated for the tyres of the corresponding size respectively. Do not use the tube in combination with the tyre of the different size.
The Tube with Puncture Endurance is structured to be tough against air leakage when a sharp object pierces into the tyre. Note that a foreign material can get stuck into the tyre no matter the tyre pressure may look to be normal. Remove the foreign material from the tyre when it is found during the daily check and repair the tube as soon as possible.
When the rim or tyre is wet with the fluid or when the tyre pressure is low, check the tyre for a foreign material and remove it. Repair the tube immediately.
The fluid can come out when removing the foreign material from the tyre. Take care not to get the fluid on you.
The damage that can be repaired is up to 3 mm in size. When the damage is larger than 3 mm, replace the tube.
When replacing the tyre, select the new tube of the same size.
Use the tube with the specified air pressure.
To check for puncture before or after repair, inflate the tube as large as the tyre inner dia meter size (i.e. to the degree that maintains the cylinder of the tube). On the fluid chamber side, this can be checked with the fluid oozing out of the chamber, excessive inflation of the tube will cause the air to enter the fluid chamber, deteriorating the puncture function. (the material of liquid: anti freeze mixture, fiber, etc)
Caution
Wash out the fluid thoroughly with water when it gets on your skin or in your eyes and get the medical attention promptly.
Damages to which Tube with Puncture Endurance is not effective:
(1) Burst
(2) Damage outside the grounding surface of the tyre (e.g. rim, sides of tyre, etc, that are not mounted with the fluid chamber)
(3) Damaged or rubbed with a rusted nail, etc.
(4) Large damage or L- shaped damage
(5) Damages resulted from neglect of the above note.
Clutch
Clutch adjustment may be required if the motorcycle stalls when shifting in to gear or tends to creep or if the clutch slips causing acceleration to lag behind engine speed.
Normal clutch lever free play is 10- 20 mm at the lever.
To adjust the free play,
- Loosen the lock nut.
- Turn the adjusting nut to obtain the specified free play.
- Tighten the lock nut and check the adjustment
- Start the engine, press the clutch lever and shift into gear.
- Make sure the engine does not stall and the motorcycle does not creep.
- Gradually release the clutch lever and open the throttle.
- The motorcycle should start smoothly and accelerate.
Note
If proper adjustment cannot be obtained or the clutch does not work properly, visit your Authorised Hero MotoCorp Workshop.
Other Checks
- Check the clutch cable for kinks or signs of wear that could cause sticking or failure
- Check for clutch cable model. Use genuine clutch cables.
- Check for clutch cable routing.
Steering
Check that the control cables do not interfere with the handlebar rotation.
Check for smooth action & maneuverability.
Note
- Park the motorcycle on its main stand and raise the front wheel off the ground.
- check that the handlebar rotates freely from side to side.
- If the handlebar moves unevenly, binds, or has play, inspect and adjust the steering head bearings.
- Check for worn steering stem bearings by grabbing the front fork leg and attempting to move the front for side to side.
- Adjust/replace the bearings if any play is observed
Battery
Conventional Battery
The battery is located behind the right side cover.
Maintenance
Check the battery electrolyte. The electrolyte level must be maintained between the upper and lower level marks on the battery. If the electrolyte level is low, disconnect the cable from battery negative and positive terminals, remove the bolt and remove the bracket for access to the battery. Remove the battery filler caps.
Carefully add distilled water to the upper level mark using a small plastic funnel.
Note
- Use only distilled water in the battery. Tap water may shorten the service life of the battery.
- Dispose off used/ old battery to authorized dealer only.
- Insufficient electrolyte results in sulphation & plate damage.
Maintenance Free Battery
The battery is located behind the right side cover.
It is not necessary to check the battery electrolyte level or add distilled water as the battery is a Maintenance-Free (sealed) type. If battery seems weak and/or electrolyte is leaking (causing hard starting or other electrical troubles), contact your Authorised Hero MotoCorp workshop.
Note
- This symbol on the battery means that this product must not be treated as household waste.
- This symbol on the battery means the old battery must be returned to your Authorised Hero MotoCorp workshop as it must be treated as recyclable material.
- Battery is a Maintenance-Free (sealed) type and can be permanently damaged if the sealing strip is removed.
- An improperly disposed battery can be harmful to the environment and human health. Always confirm local regulations for battery disposal.


Warning
- The battery gives off explosive hydrogen gas during normal operation.
- A spark or flame can cause the battery to explode with enough force to seriously hurt you.
- Wear protective clothing and a face shield, or have skilled mechanic do the battery maintenance.
Lamps & Horns
Check if the headlamp, Tail lamp, Turn signal lamp, Indicators, and Horn are working properly.
Rear View Mirror
.png)
Ensure that the rear view mirror gives the better view when you are sitting on the motor cycle.
Air Suction Valve
- To meet the emission standards, most of the vehicles in Hero MotoCorp are equipped with ASV.
- Make sure all the hose and tubes are connected securely.
- Air suction valve supplies fresh air from the air filter to the exhaust manifold to convert carbon monoxide to carbon dioxide.
- This reduces the CO% in the vehicles exhaust.
Fittings & Fastners
Tighten bolts and nuts at regular intervals shown in the maintenance schedule.
Check all the chassis nuts and bolts are tightened to correct torque values.
Check that all cotter pins slip pins, hose clamps and cable stays are in place.
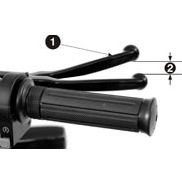
Throttle
Throttle Adjustment On Throttle Grip Side
Cable Inspection
Check for smooth rotation of the throttle grip from the fully open to the fully closed position. Check at full left and full right steering positions. Inspect the condition of the throttle cable from the throttle grip down to the carburetor. If the cable is kinked, chafed or improperly routed, it should be replaced or rerouted. Standard throttle grip free play is approximately 2-6 mm of grip rotation.
Free Play Adjustment
Slide the grommet, loosen the lock nut and turn the adjuster.
Throttle Adjustment On FI Vehicles.
Cable inspection
Check for smooth rotation of the throttle grip from the fully open to the fully closed position. Check at full left and full right steering positions. Inspect the condition of the throttle cable from the throttle grip down to the throttle body. If the cable is kinked, chafed or improperly routed, it should be replaced or rerouted. Standard throttle grip free play is approximately 2-6 mm of grip rotation.Loosen the lock nut and turn the adjuster.
Fuse Replacement
%20(1).png)
Two types of fuses are used in our Hero MotoCorp vehicles are explained below,
1. The fuse holder is placed adjacent to the battery which consists of specified fuse 7A and the spare fuse.
Warning
- Never use a fuse with a different rating from that specified. It may lead to serious damage to the electrical system or a fire due to short circuit.
- Battery gives of explosive gases. keep sparks, flames & cigarettes away.
Caution
- When checking battery electrolyte level or adding distilled water, make sure the breather tube is connected to the battery breather outlet.
- Do not attempt to start or drive the motorcycle without a charged battery, it can cause fusing of the bulbs and permanent damage to certain electrical components.
- Turn the ignition switch "OFF" before checking or replacing the fuse to prevent accidental short circuiting.
2. The fuse box is mounted on the battery clamp.
Warning
- Never use a fuse with a different rating from that specified. It may lead to serious damage to the electrical system or a fire due to short circuit.
- Battery gives of explosive gases. keep sparks, flames & cigarettes away.
Caution
- Do not attempt to start or drive the motorcycle without a charged battery, it can cause fusing of the bulbs and permanent damage to certain electrical components.
- Turn the ignition switch "OFF" before checking or replacing the fuse to prevent accidental short circuiting.
FUEL SAVING TIPS
MAXIMUM MILEAGE. MAXIMUM RIDE.
Follow these guidelines and kick start an awesome journey on the road.
DO'S
- Drive at steady speed.
- Maintain correct tyre pressure.
- Adjust drive chain tension correctly.
- Get your engine tuned and motorcycle serviced regularly by a Hero MotoCorp authorised workshop.
DONT'S
- Do not keep the clutch lever pressed while driving.
- Do not run the engine in low gear for long times.
- Do not park your motorcycle under direct sunlight as it causes evaporation of petrol.
- Do not keep brake pedal pressed while riding.
- Do not raise the engine rpm during traffic halts, switch “OFF” the engine if the halt is more than 30 seconds.
- Do not cover inlet of air filter assembly.
- Do not cover the engine in the front and sides. This may restrict the smooth air flow to the engine fins required for air cooling and the engine may run at a higher temperature.
In case you wish to have the fuel efficiency tested, please visit the nearest |Authorised Hero MotoCorp workshop and ask for a fuel efficiency test (KPL Test) done. Make any adjustments that are found necessary.
 Angola
 Argentina
 Bangladesh
 Bolivia
 Colombia
 Costa Rica
 Dominican Republic
 DRC
DRC
 Ecuador
 El Salvador
 Ethiopia
 France
 GCC
GCC
 Germany
 Great Britain
 Guatemala
 Guinea
 Guyana
 Haiti
Haiti
 Honduras
 India
India
 Italy
Italy
 Kenya
Kenya
 Madagascar
 Mexico
 Myanmar
 Nepal
Nepal
 Nicaragua
 Nigeria
 Panama
 Peru
Peru
 Philippines
 Spain
Spain
 Sri Lanka
 Tanzania
 Trinidad
 Turkey
 Uganda
 Zambia